

8.府県天気予報の作り方
8-1.府県天気予報のURL
以下のURLにブラウザで直接アクセスすれば、府県天気予報のJSONデータを確認できます。
・三重県の府県天気予報を取得する
https://www.jma.go.jp/bosai/forecast/data/forecast/240000.json
8-2.府県天気予報の発表時刻
府県天気予報の発表時刻内容は、
①5時、今日・明日の天気、今日の最高気温、明日の最高・最低気温
②11時、今日・明日・明後日の天気、今日の最高気温、明日の最高・最低気温
③17時、今日・明日・明後日の天気、明日の最高・最低気温
の一日三回です。
発表時刻によって更新内容が違いますので、対応した処理プログラムを書く必要があります。
8-3.府県天気予報のデータ仕様
三重県のデータを参考に見てみます。
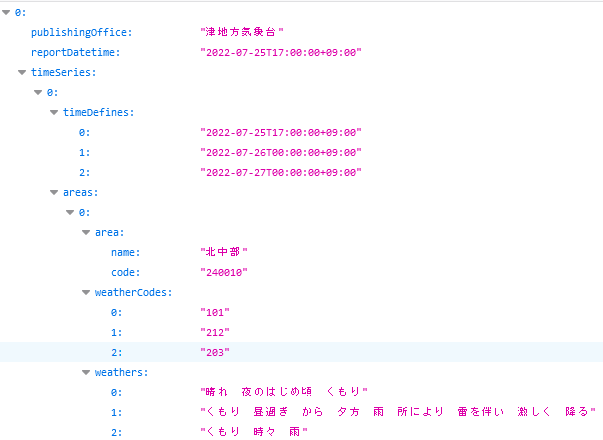
①5時発表のデータ仕様
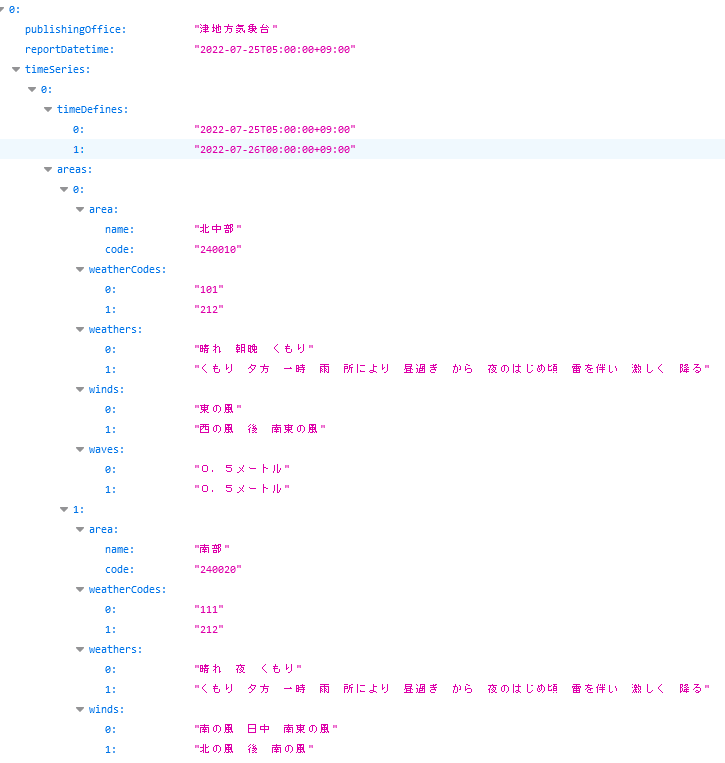
timeDefinesを確認すると、今日明日のデータであることが分かります。
その為weatherCodesは、今日[0]明日[1]と二つあります。
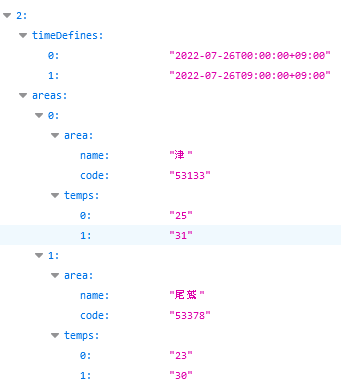
気温データ仕様は、
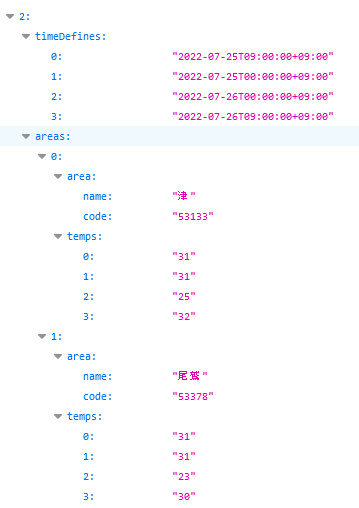
気温データは、temps[0][1]は今日の最高気温です。
なぜか、[0][1]に同じデータが入っています。
temps[2]は、明日の最低気温データ
temps[3]は、明日の最高気温データ
が入っています。
②11時発表のデータ仕様
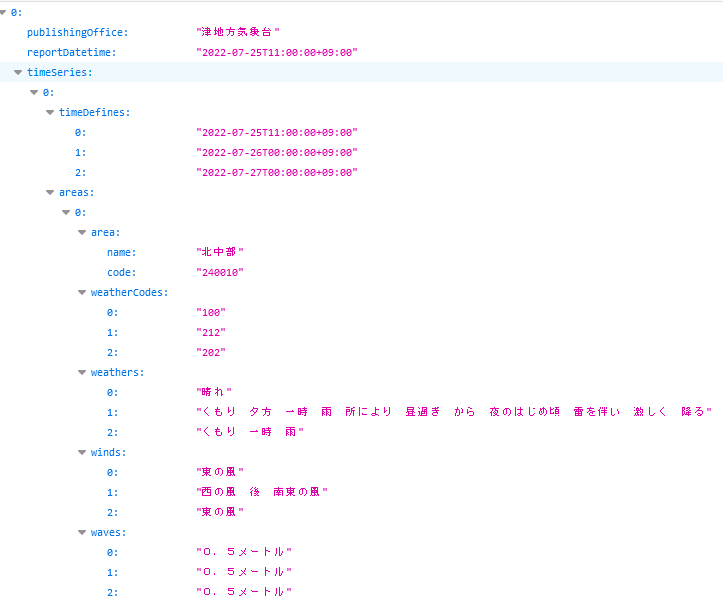
11時発表のデータは、今日明日明後日のデータになります。
その為weatherCodesは、今日[0]明日[1]明後日[2]と3つあります。
気温データ仕様は、
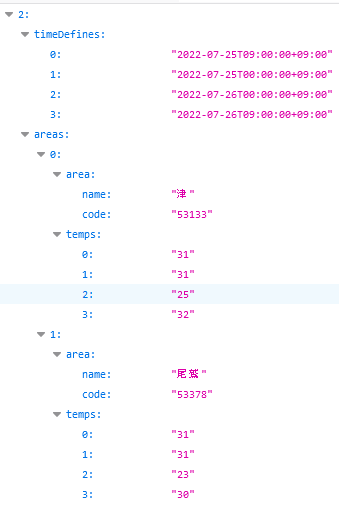
気温データは、temps[0][1]は今日の最高気温です。
temps[2]は、明日の最低気温データ
temps[3]は、明日の最高気温データ
明後日の最高最低気温データはありません。
③17時発表のデータ仕様
17時発表のデータは、今日明日明後日のデータになります。
その為weatherCodesは、今日[0]明日[1]明後日[2]と3つあります。
気温データ仕様は、
気温データは、temps[0][1]は明日の最高最低気温です。
この様に発表時刻において、天気コードが今日明日になったり今日明日明後日になったりします。
気温コードも17時発表のデータは、配列が明日[0][1]のみになりますので、条件に合った処理プログラムを書く必要があります。
8-4.府県天気予報の処理プログラム
処理プログラムは、下記になります。
<?php
      $url = "https://www.jma.go.jp/bosai/forecast/data/forecast/240000.json";

      $json = file_get_contents($url);
      $data = json_decode($json,true);

      $publisher = $data[0]['publishingOffice'];
      $publish_time = $data[0]['reportDatetime'];

      $publish_time = str_replace('T', ' ', $publish_time);
      $publish_time = str_replace(':00+09:00', '', $publish_time);

      // 第一地域
      $area = $data[0]['timeSeries'][0]['areas'][0]['area']['name'];
   // 今日の予報
      $today = $data[0]['timeSeries'][0]['areas'][0]['weathers'][0];
      $today_code = $data[0]['timeSeries'][0]['areas'][0]['weatherCodes'][0];

      // 明日の予報
      $tomorrow = $data[0]['timeSeries'][0]['areas'][0]['weathers'][1];
      $tomorrow_code = $data[0]['timeSeries'][0]['areas'][0]['weatherCodes'][1];

   // 明後日の予報確認
      if(isset($data[0]['timeSeries'][0]['areas'][0]['weathers'][2])){
        $dayAfterTomorrow = $data[0]['timeSeries'][0]['areas'][0]['weathers'][2];
        $dayAfterTomorrow_code = $data[0]['timeSeries'][0]['areas'][0]['weatherCodes'][2];
      }

      echo '発表者   : $publisher';
      echo '発表日時  : $publish_time';
      echo '対象地域  : $area';

      $filePath = "./wicon/{$today_code}.png";
      $data1 = file_get_contents($filePath);
      $img = base64_encode($data1);

      // 明日の気温データ確認
      if(isset($data[0]['timeSeries'][2]['areas'][0]['temps'][2])){
      $tomorrow_templow = $data[0]['timeSeries'][2]['areas'][0]['temps'][2];
      $tomorrow_temphigh = $data[0]['timeSeries'][2]['areas'][0]['temps'][3];
      }
      $tomorrow_templow1 = $data[0]['timeSeries'][2]['areas'][0]['temps'][0];
      $tomorrow_temphigh1 = $data[0]['timeSeries'][2]['areas'][0]['temps'][1];

      // 天気アイコンの読み込み
      $filePath1 = "./wicon/{$tomorrow_code}.png";
      $data2 = file_get_contents($filePath1);
      $img1 = base64_encode($data2);

      // 明後日の天気予報確認
      if(isset($data[0]['timeSeries'][0]['areas'][0]['weathers'][2])){
        $filePath2 = "./wicon/{$dayAfterTomorrow_code}.png";
        $data3 = file_get_contents($filePath2);
        $img2 = base64_encode($data3);
      }
?>
      <!-- 天気アイコンの表示 -->
      <div class="flexbox">
            <div class="f-item1">今日の天気>
                  <img src="data:image/png;base64,<?php echo $img;?>" >
                        <?php echo $today;
                        if(isset($data2[0]['timeSeries'][2]['areas'][0]['temps'][2])){
                           echo "最高 : $tomorrow_templow1 ℃";
                        }
                        ?>
            </div>
            <div class="f-item1">明日の天気
                  <img src="data:image/png;base64,<?php echo $img1;?>" >
                        <?php echo $tomorrow;
                        if(isset($data2[0]['timeSeries'][2]['areas'][0]['temps'][2])){
                              echo "最高 : $tomorrow_temphigh ℃";
                              echo "最低 : $tomorrow_templow ℃";
                        } else {
                              echo "最高 : $tomorrow_temphigh1 ℃";
                              echo "最低 : $tomorrow_templow1 ℃";
                        }
                        ?>
            </div>
            <?php
         // 明後日の予報確認
                  if(isset($data2[0]['timeSeries'][0]['areas'][0]['weathers'][2])){
            ?>
            <div class="f-item1">明後日の天気
                  <img src="data:image/png;base64,<?php echo $img2; ?>" >
                        <?php echo $dayAfterTomorrow;?>
            </div>
            <?php
                  }
            ?>
      </div>
?>
①明後日の予報データ確認
if(isset($data[0][‘timeSeries’][0][‘areas’][0][‘weathers’][2])){ で、明後日のデータが存在していれば、
予報文と天気コードを $dayAfterTomorrow 、$dayAfterTomorrow_code に代入しています。
isset関数は、変数に値がセットされていて、かつNULLでないときに、TRUE(真)を戻り値として返します。
// 明後日の天気予報確認
if(isset($data[0]['timeSeries'][0]['areas'][0]['weathers'][2])){
        $dayAfterTomorrow = $data[0]['timeSeries'][0]['areas'][0]['weathers'][2];
        $dayAfterTomorrow_code = $data[0]['timeSeries'][0]['areas'][0]['weatherCodes'][2];
      }
また、明後日のデータが存在していれば、
7章でご説明した天気テロップコード一覧をwiconフォルダに全部入れ込んで、$dayAfterTomorrow_code に天気コードを代入して
{$dayAfterTomorrow_code}.png として、天気アイコン画像を抽出しています。
// 明後日の天気予報確認
if(isset($data[0]['timeSeries'][0]['areas'][0]['weathers'][2])){
 $filePath2 = "./wicon/{$dayAfterTomorrow_code}.png";
②今日明日の最高最低気温の確認
if(isset($data[0][‘timeSeries’][2][‘areas’][0][‘temps’][2])){ で、三番目の気温データが存在する場合
$tomorrow_templow、$tomorrow_temphigh に明日の最低・最高気温を代入します。
次に、$tomorrow_templow1、$tomorrow_temphigh1 に今日の最高気温を代入します。
また、if(isset($data[0][‘timeSeries’][2][‘areas’][0][‘temps’][2])){ が存在しない場合は、
明日の最高最低気温を $tomorrow_templow1、$tomorrow_temphigh1 に代入します。
// 今日明日の気温データ確認
    if(isset($data[0]['timeSeries'][2]['areas'][0]['temps'][2])){
      $tomorrow_templow = $data[0]['timeSeries'][2]['areas'][0]['temps'][2];
      $tomorrow_temphigh = $data[0]['timeSeries'][2]['areas'][0]['temps'][3];
      }
      $tomorrow_templow1 = $data[0]['timeSeries'][2]['areas'][0]['temps'][0];
      $tomorrow_temphigh1 = $data[0]['timeSeries'][2]['areas'][0]['temps'][1];
そして、if(isset($data2[0][‘timeSeries’][2][‘areas’][0][‘temps’][2])){ が存在すれば、最高気温として $tomorrow_templow1 を表示します。
$tomorrow_temphigh1 にも同じデータが入力されていますが、一度 $tomorrow_temphigh1 のデータが変更されているときがありましたので
$tomorrow_templow1 を表示しています。
// 今日の気温データ確認
    if(isset($data2[0]['timeSeries'][2]['areas'][0]['temps'][2])){
       echo "最高 : $tomorrow_templow1 ℃";
さらに明日の最高最低気温で、if(isset($data2[0][‘timeSeries’][2][‘areas’][0][‘temps’][2])){ が存在すれば、
最高最低気温の3番目、4番目を表示します。
if(isset($data2[0][‘timeSeries’][2][‘areas’][0][‘temps’][2])){ が存在しなければ、1番目と2番目の最高最低気温を表示します。
// 明日の気温データ確認
    if(isset($data2[0]['timeSeries'][2]['areas'][0]['temps'][2])){
         echo "最高 : $tomorrow_temphigh ℃";
         echo "最低 : $tomorrow_templow ℃";
    } else {
         echo "最高 : $tomorrow_temphigh1 ℃";
         echo "最低 : $tomorrow_templow1 ℃";
    }
以上で、府県天気予報の作り方は終わりです。
お疲れ様でした!
気温以外のデータは、まだ対応しておりません😅